Introduction
Raspberry Pi OS is the official OS from the Raspberry Pi Foundation.
As a beginner, I appreciated the guides and the official support forum.
However, I sometimes found myself in a situation where packages from the official repositories were outdated for stability. Often, to install new or less popular packages, I had to execute unknown commands via curl | bash or add dedicated repositories (PPAs) to my system.
No thanks.
While searching for a solution, I discovered Arch Linux ARM, a port of the Arch Linux distribution for ARM devices. The main difference is the rolling release model, meaning there are no large system updates (e.g. Debian 13 -> 14) since packages are always available in the latest version. In addition, over 85000 community-maintained packages can be easily installed from the Arch User Repository (AUR).
In this guide, I explain how I installed Arch Linux ARM on different Raspberry Pi models. The procedure varies slightly between 32-bit (Raspberry Pi 2) and 64-bit devices (Raspberry Pi 3 and 4), as they use different boot loaders.
As of September 2024, the Raspberry Pi 5 is still not officially supported, however Eduard Urbach and Sven Kiljan provided a workaround to install Arch Linux ARM on it.
Caveat for Windows users
Most guides about installing Arch Linux ARM assume you already have a PC running Linux. Indeed, there are two main issues for Windows users:
- lack of native support for creating and accessing EXT4 partitions on a USB drive
- the requirement to run a program not available for Windows
If you have a Windows PC like most people, I recommend that you format a USB flash drive with Ventoy, then download and boot GParted Live from it, as I did in this post.
Beware of Micro SD card failures
I will assume that the Raspberry Pi will be used as a personal server, so it will:
- be up and online 24/7
- be accessible via SSH
- have a static LAN IP address
For this kind of usage, I strongly discourage using a micro SD card or a USB flash drive for OS and storage, as they will break after a few months of being written 24/7 (source: personal experience).
On the other hand, a USB SSD or HDD will last for years without problems, especially if it is connected to a powered USB hub.
Using a micro SD card just for booting is fine, as it is not written that often.
Requirements
We will need the following items:
- a Raspberry Pi 2, 3 or 4
- a Linux PC able to read micro SD cards
- a USB SSD or HDD for the root partition
- a spare micro SD card (512MB+) for the boot partition
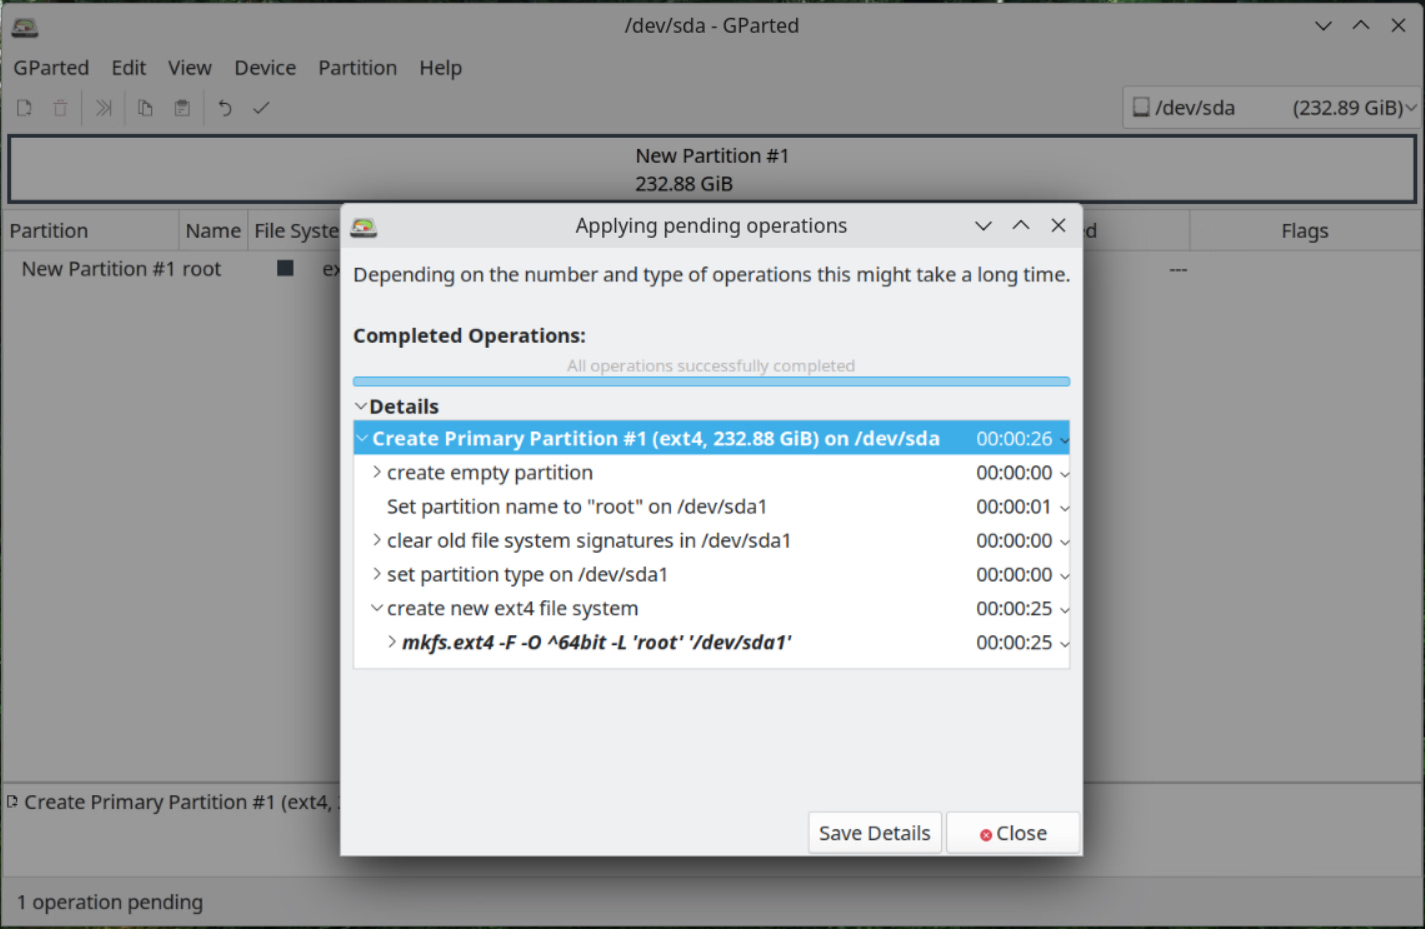
Prepare the storage drives
We will now format the micro SD card and USB SSD, after connecting them to the PC. This can be accomplished using different programs, but I’ll explain the steps for GParted. Beware of accidentally formatting the computer SSD or the Ventoy flash drive.
Click on “GParted > Refresh Devices” to view the micro SD card and SSD devices from the drop-down menu on the right.
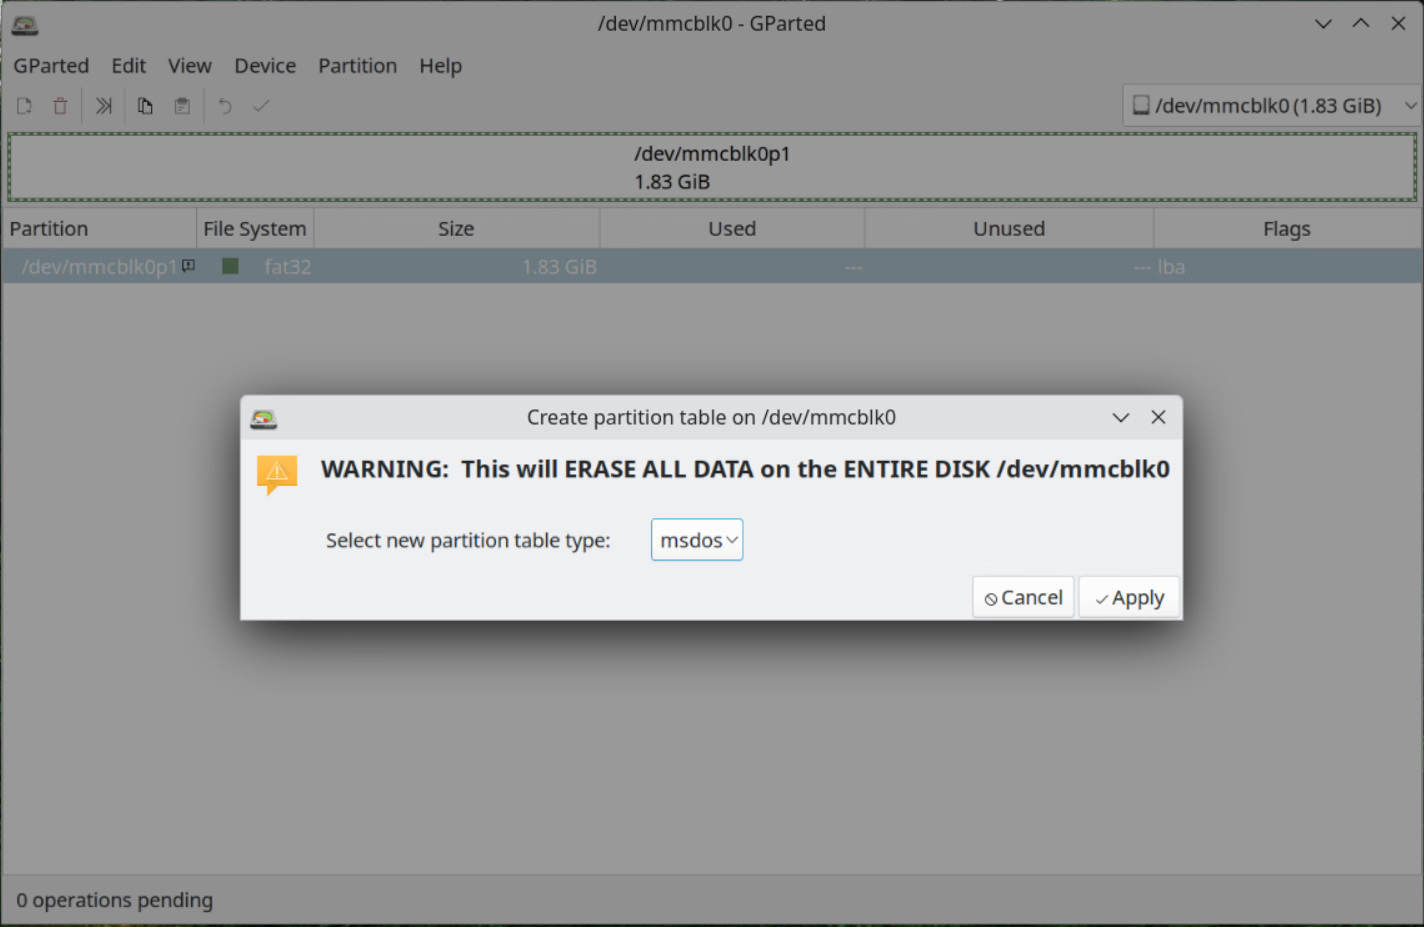
Select the micro SD card, click on “Device > Create Partition Table…” and select “msdos”
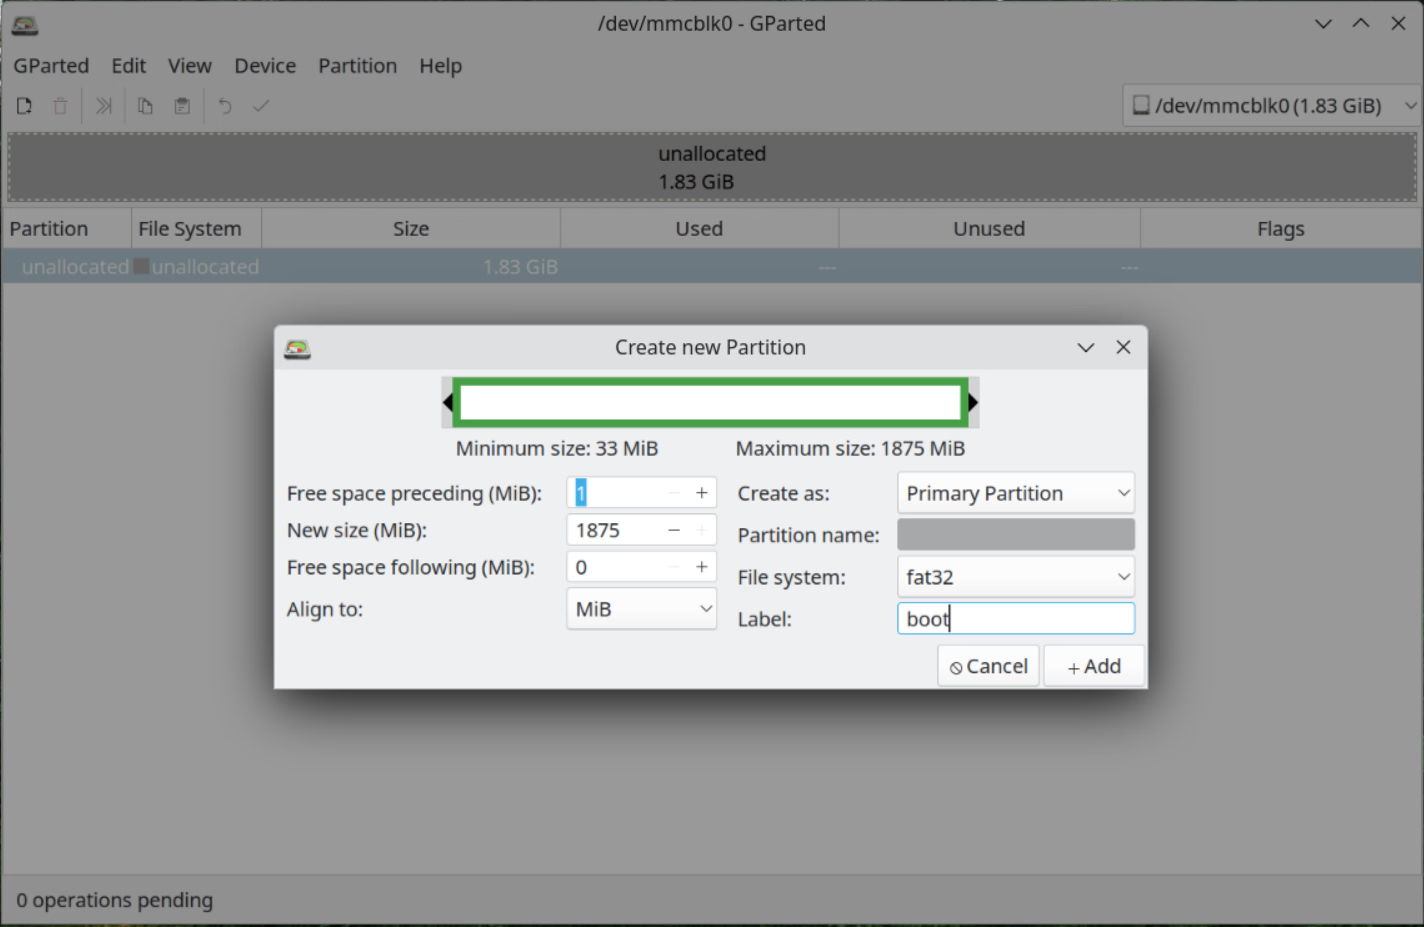
Right-click the unallocated space and click “New”, then create a “fat32” partition:
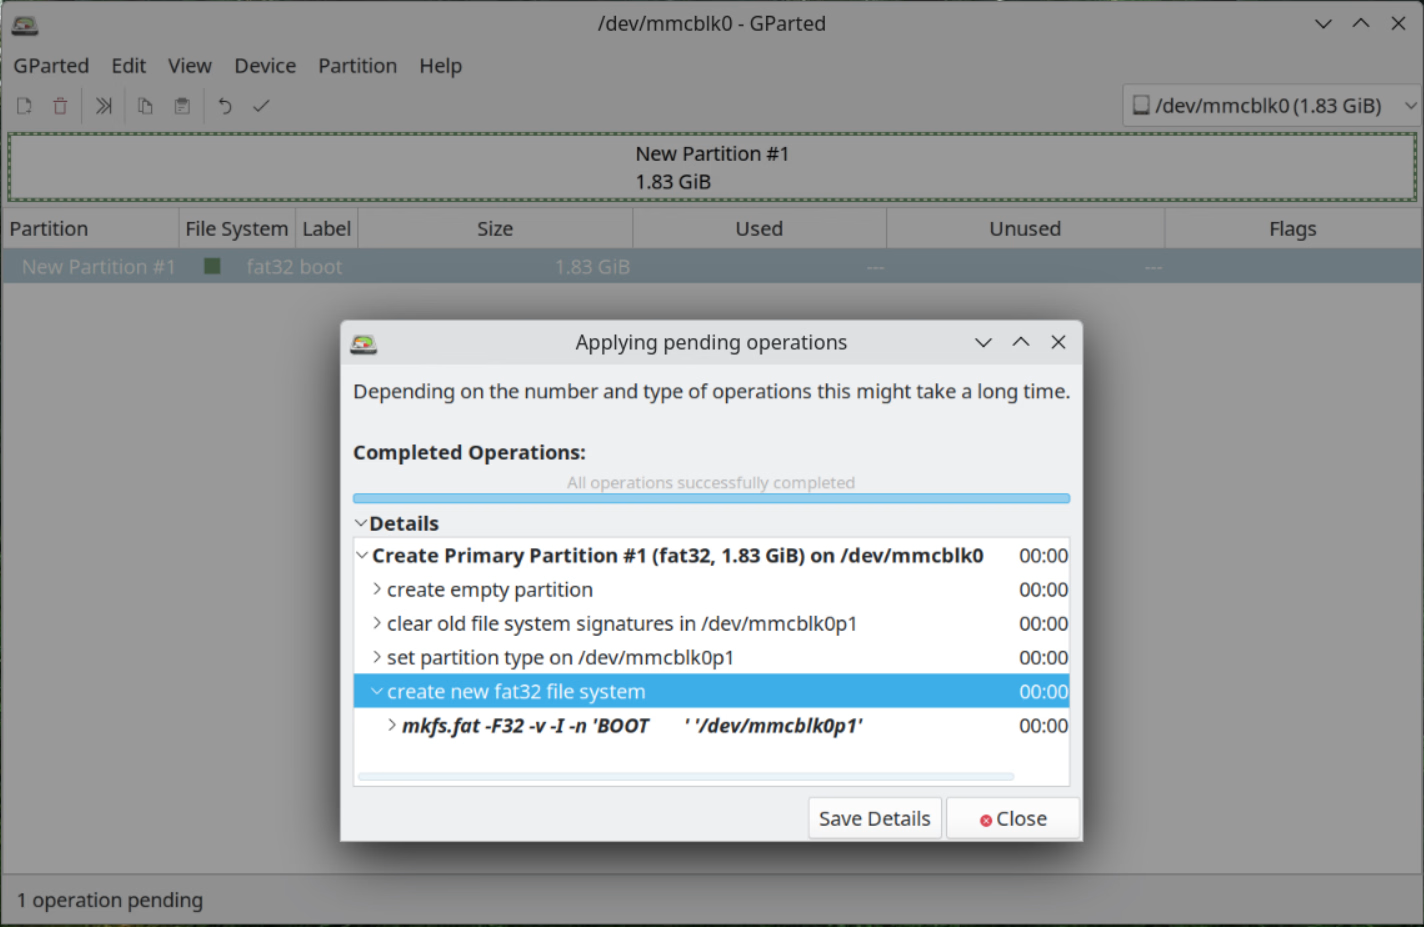
Click on the “Apply All Operations” green check mark under “Device”.
Now, repeat the operation for the SSD, but this time using a “gpt” partition table and “ext4” file system for the root partition, making it as large as needed. You can also create additional partitions in the SSD at this stage.
Download and extract the file system
Now we will extract Arch Linux ARM files to both the micro SD card and the SSD.
From a terminal window in your PC, create two new folders:
su
mkdir -p /Arch/boot /Arch/root
cd /Arch
Take note of the device names by running lsblk:
NAME              MAJ:MIN RM   SIZE RO TYPE  MOUNTPOINTS
sda                 8:0    0 232.9G  0 disk
  sda1              8:1    0 232.9G  0 part
sdb                 8:16   1   3.8G  0 disk
  sdb1              8:17   1   3.8G  0 part
  sdb2              8:18   1    32M  0 part
mmcblk0           179:0    0   1.8G  0 disk
  mmcblk0p1       179:1    0   1.8G  0 part
In my case, /dev/sda1 is the first partition of my 256GB SSD, and /dev/mmcblk0p1 is the first partition of my 2GB micro SD card.
Let’s mount these devices to the respective folders:
mount /dev/sda1 /Arch/root
mount /dev/mmcblk0p1 /Arch/boot
Check the result with lsblk:
NAME              MAJ:MIN RM   SIZE RO TYPE  MOUNTPOINTS
sda                 8:0    0 232.9G  0 disk
  sda1              8:1    0 232.9G  0 part  /Arch/root
sdb                 8:16   1   3.8G  0 disk
  sdb1              8:17   1   3.8G  0 part
  sdb2              8:18   1    32M  0 part
mmcblk0           179:0    0   1.8G  0 disk
  mmcblk0p1       179:1    0   1.8G  0 part  /Arch/boot
Download and extract the Arch Linux ARM file system inside the SSD:
# download for Raspberry Pi 2 (32 bit)
wget -O "alarm.tar.gz" http://os.archlinuxarm.org/os/ArchLinuxARM-rpi-armv7-latest.tar.gz

# download for Raspberry Pi 3, 4 (64 bit)
wget -O "alarm.tar.gz" http://os.archlinuxarm.org/os/ArchLinuxARM-rpi-aarch64-latest.tar.gz

# extract
tar zxf "alarm.tar.gz" -C /Arch/root
sync
Move all files inside “/Arch/root/boot/” to the micro SD card, without moving the folder:
mv /Arch/root/boot/* /Arch/boot

# there should be files
ls -la /Arch/boot

# it should be empty
ls -la /Arch/root/boot
Configure the boot loader
Now we need to adjust some files to tell the boot loader that the root file system is actually in the USB drive, and not in a second partition in the micro SD card (as per default configuration).
Let’s read and note the partition IDs of the two partitions:
blkidAmong the results, search for /dev/sda1 and /dev/mmcblk0p1, the device names we found before:
/dev/mmcblk0p1: LABEL_FATBOOT="BOOT" LABEL="BOOT" UUID="9961-C20C" BLOCK_SIZE="512" TYPE="vfat" PARTUUID="a5cfa774-01"
/dev/sda1: LABEL="root" UUID="aa67373d-ee88-438f-9ba0-80f173bb7916" BLOCK_SIZE="4096" TYPE="ext4" PARTLABEL="root" PARTUUID="d6770a38-fb4d-42d8-867f-223faab7187c"
In my case, a5cfa774-01 is the partition ID for my micro SD card, and d6770a38-fb4d-42d8-867f-223faab7187c is the ID for my SSD.
32-bit devices
If you have a Raspberry Pi 2, open the boot loader configuration file:
nano /Arch/boot/cmdline.txtYou should see:
root=/dev/mmcblk0p2 rw rootwait console=serial0,115200 console=tty1 fsck.repair=yesReplace /dev/mmcblk0p2 with PARTUUID= and the partition ID of the SSD.
The file content should now look like this:
root=PARTUUID=d6770a38-fb4d-42d8-867f-223faab7187c rw rootwait console=serial0,115200 console=tty1 fsck.repair=yesClose the file by pressing CTRL+X and then Y.
64-bit devices
If you have a Raspberry Pi 3 or 4 instead, open the boot loader configuration file:
nano /Arch/boot/boot.txtYou should see:
# After modifying, run ./mkscr

# Set root partition to the second partition of boot device
part uuid ${devtype} ${devnum}:2 uuid

setenv bootargs console=ttyS1,115200 console=tty0 root=PARTUUID=${uuid} rw rootwait smsc95xx.macaddr="${usbethaddr}"

# ...
Comment out the line starting with part.
In the line starting with setenv replace ${uuid} with the PARTUUID of /dev/sda1.
The file content should now look like this:
# After modifying, run ./mkscr

# Set root partition to the second partition of boot device
#part uuid ${devtype} ${devnum}:2 uuid

setenv bootargs console=ttyS1,115200 console=tty0 root=PARTUUID=d6770a38-fb4d-42d8-867f-223faab7187c rw rootwait smsc95xx.macaddr="${usbethaddr}"

# ...
Close the file by pressing CTRL+X and then Y.
To apply these changes, we need to install U-boot Tools and launch a command.
For GParted Live and other Debian derivative distributions, this package is called u-boot-tools, while for Arch Linux and derivatives, it’s called uboot-tools.
In GParted Live, install the package by running:
apt install u-boot-toolsFinally, launch /Arch/boot/mkscr to apply changes:
cd /Arch/boot
./mkscr
The program should output the following:
./mkscr
Image Name:   U-Boot boot script
Created:      Sun Sep 01 20:27:40 2024
Image Type:   ARM Linux Script (uncompressed)
Data Size:    644 Bytes = 0.63 KiB = 0.00 MiB
Load Address: 00000000
Entry Point:  00000000
Contents:
  Image 0: 636 Bytes = 0.62 KiB = 0.00 MiB
Configure the file system table
The next step ensures we are mounting our partitions to the right location with appropriate options. Open the file system table:
nano /Arch/root/etc/fstabBoot partition
Replace /dev/mmcblk0p1 with PARTUUID= and the partition ID of the micro SD card.
# Static information about the filesystems.
# See fstab(5) for details.

# <file system> <dir> <type> <options> <dump> <pass>

# boot partition /dev/mmcblk0p1
PARTUUID=a5cfa774-01                            /boot   vfat    defaults            0   0
Once we boot our Raspberry Pi, the micro SD card partition will be mounted to “/boot”.
Root partition
Add a new line with the partition ID of the SSD, setting
/as dirext4as typedefaults,noatimeas options0as dump1as pass
The file system table should now look like this:
# ...

# root partition /dev/sda1
PARTUUID=d6770a38-fb4d-42d8-867f-223faab7187c   /       ext4    defaults,noatime    0   1
Other partitions
In case of additional partitions, add a row for each one of them, and set the number in the last column to 2.
This is an example of an ExFAT partition that will be automatically mounted to /data.
# ...

# data partition /dev/sda2
PARTUUID=dda122d0-0c65-49d3-ac92-354e33ac7569   /data   exfat   defaults,noatime,nofail,user,uid=1000,gid=1000,umask=000    0   2
The ExFAT file system can be read natively by Windows, MacOS, and Linux devices, but doesn’t store file ownership and permissions. In the previous example, any user in the system can write to
/data(umask=000), but files will appear as owned by the user with UID 1000:
Configure a static IP address
If we want to assign a static IP address to the server, we can assign it from the router or claim it from the Raspberry Pi.
In the first case, no further configuration is needed on the Raspberry Pi.
In the second case, we should configure the router to restrict the pool of DHCP IP addresses. E.g. if we want to assign 192.168.1.10 to the Raspberry Pi, the router should only assign addresses between 11 and 255, to avoid assigning 10 to another LAN client.
Then, the Raspberry Pi should be configured as follows.
Via Ethernet
If the Raspberry Pi will be connected via ethernet, remove existing network configurations and create a “.network” file:
rm /Arch/root/etc/systemd/network/e*
nano /Arch/root/etc/systemd/network/ethernet.network
Copy inside this content:
[Match]
Name=e*

[Network]
Address=192.168.1.10/24
Gateway=192.168.1.1
DNS=1.1.1.1
DNS=8.8.8.8
Quick explanation:
- this configuration applies to all interfaces starting with “e” (e.g. “eth0”, “end0”, “enp2s0”)
- the Raspberry Pi will claim 192.168.1.10 as its address
- the router address is 192.168.1.1
- the Raspberry Pi will ask 1.1.1.1 and 8.8.8.8 to resolve domain names like “example.org” (optional)
To make these changes permanent, run:
cd /Arch/root/etc/systemd/system/multi-user.target.wants
ln -sf /usr/lib/systemd/system/systemd-networkd.service "systemd-networkd.service"
Via Wi-Fi
If the Raspberry will be connected via Wi-Fi, create a “.network” file:
nano /Arch/root/etc/systemd/network/wifi.networkCopy inside this content:
[Match]
Name=w*

[Network]
IgnoreCarrierLoss=3s
Address=192.168.1.11/24
Gateway=192.168.1.1
DNS=1.1.1.1
DNS=8.8.8.8
We also need to store the Wi-Fi name and password in a compatible format:
wpa_passphrase "SSID" "PASSWORD" > /Arch/root/etc/wpa_supplicant@wlan0.serviceTo make these changes permanent, run:
cd /Arch/root/etc/systemd/system/multi-user.target.wants
ln -sf /usr/lib/systemd/system/systemd-networkd.service "systemd-networkd.service"
ln -sf /usr/lib/systemd/system/wpa_supplicant@.service "wpa_supplicant@wlan0.service"
Avoid kernel message flood
Someone decided that having the kernel flood the console with messages was a good idea.
Since this behavior is annoying and dangerous, we override it and keep our console clean.
Create a file under sysctl.d, ending in “.conf”:
nano /Arch/root/etc/sysctl.d/custom.confAdd the following lines:
# prevent kernel messages from flooding the console
kernel.printk=2
First boot
After these operations, we can safely unmount the micro SD card and SSD:
cd
umount /Arch/boot /Arch/root
Remove them from the PC and insert them in the Raspberry Pi, then boot the device. After a couple of minutes, we should be able to connect remotely from the PC, using the static IP address we set before:
ping -c 5 192.168.1.10
ssh alarm@192.168.1.10
When asked to trust the host fingerprint, answer “yes”, then enter the user password “alarm”.
These are the default users in the system:
| ID | User | Password | Privileges |
|---|---|---|---|
| 0 | root | root | full |
| 1000 | alarm | alarm | limited |
Before running other commands on the Raspberry Pi, I recommend to change the default passwords:
su root
passwd root
passwd alarm
Then initialize the package archive:
pacman-key --init
pacman-key --populate archlinuxarm
Update the system:
pacman -SyuWhat next
Check out my customization list to configure the system and enhance productivity in the terminal.
For web applications, consider using Podman to manage containers.
I used KiTTY as my Windows SSH client, but you can also use Cockpit for terminal access via the web.
Happy Arching!

